
Challenge:
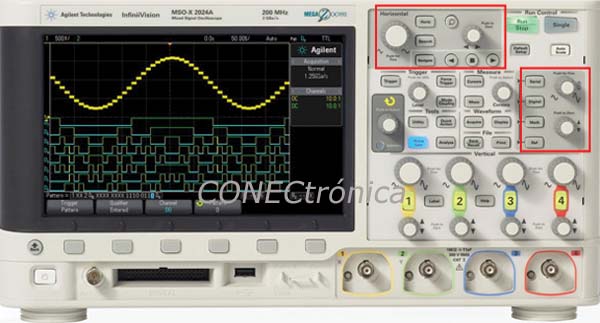
When an oscilloscope is equipped with a new set of features and a new user experience, it's important to retain some of the design elements from the previous generation. To do this, designers must first increase the capacity of the existing GUI, based on programmable keys, to accommodate new and future features. Furthermore, it's important to consider customer feedback and try to improve the basic workflow. All of this necessitated a redesign of the front panel, bringing the most common functions to the forefront for easier access. Since moving and scaling waveforms is one of the most fundamental and common tasks, scaling buttons allow users to quickly position and scale waveforms, such as math, reference memories, and digital channels, with a dedicated set of buttons, similar to those on analog channels. The user simply presses the front panel key for the waveform they want to move or scale and then uses the buttons as they would for an analog channel.
A dedicated cursor button allows you to adjust cursors from any menu. A Quick Action key has been added, which you can fully configure with a wide range of functions. Do you save a lot of files? Define the Quick Action key to activate the save settings. Do you take a lot of measurements? Define the Quick Action key to activate the new 'Measure All' function. This key offers numerous time-saving possibilities.
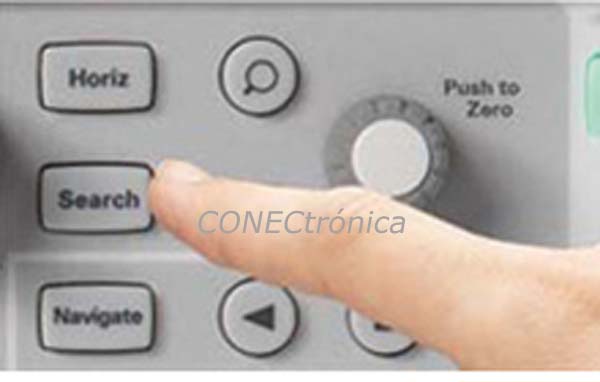
Search and Navigation Function:
We have also added a series of dedicated “navigation” buttons. These are also user-configurable and allow you to perform tasks such as panning through time, similar to the fast-forward and rewind functions on a DVD player. When capturing long and complex waveforms using the oscilloscope’s deep acquisition memory, manually scrolling through stored waveform data to find specific events can be slow and cumbersome. But with the oscilloscope’s automatic search and navigation function, you can easily set specific search criteria and then quickly navigate to the “found and marked” events using the forward and back navigation keys on the oscilloscope’s front panel.
All the rotary knobs on the front panel are now also pushbuttons. These pushbuttons provide quick and easy access to common tasks, such as auto-triggering the trigger level, switching between 'fine' and 'normal' timescale stepping, or resetting the time delay to zero.
Screen Colors: A New Design for Oscilloscopes.
To present a fresh and modern look, the software designers needed to make better use of color without overwhelming the user. Color is a very useful tool, but if overused, it negatively impacts the user experience, as the meanings and associations of colors are lost in a sea of chromatic differences. In the new color scheme shown below, the programmable keys and many other GUI elements feature sleek new designs that will be attractive without being distracting. The colors have been darkened in a combination that offers a more modern appeal. The brightness surrounding the waveform area was then reduced so that the waveform details are more clearly visible. After all, the waveforms are usually the focus. The rest of the GUI serves to support and manipulate the waveforms. The dark background colors have also allowed for the use of other colors within the GUI. For example, many of the channel icons and labels are now color-coded in the GUI, making it much easier to identify and select channels and other items.
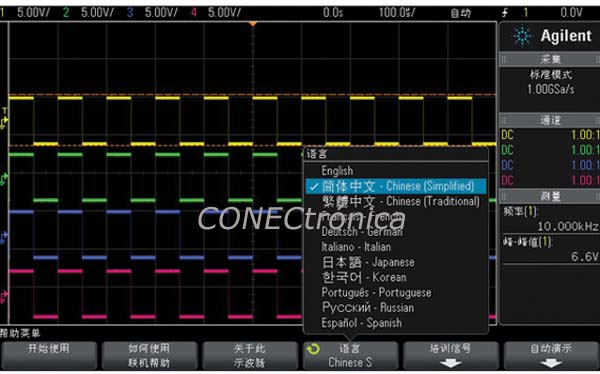
![]() To improve the visual appearance, icons and titles have been added to the pop-up menus. This provides valuable visual cues, allowing you to quickly identify the measurements or mathematical functions you need. These visual aids enhance the user experience and help you select the desired setting more quickly. Need more information about a specific function? A quick help feature, available in multiple languages, provides more detailed information about that function and allows you to operate the oscilloscope in your preferred language.
To improve the visual appearance, icons and titles have been added to the pop-up menus. This provides valuable visual cues, allowing you to quickly identify the measurements or mathematical functions you need. These visual aids enhance the user experience and help you select the desired setting more quickly. Need more information about a specific function? A quick help feature, available in multiple languages, provides more detailed information about that function and allows you to operate the oscilloscope in your preferred language.
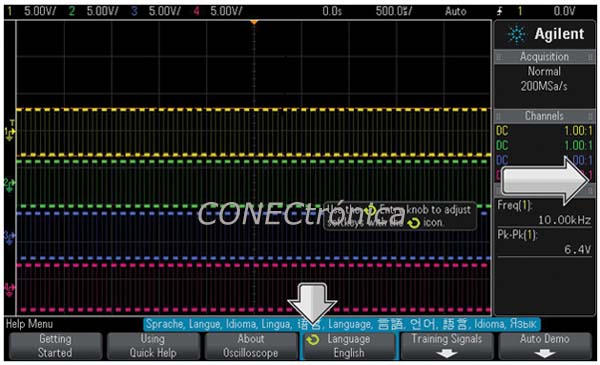
Quickly familiarize yourself with the oscilloscope layout.
One of the most frustrating aspects of operating an oscilloscope is learning how to locate the functions—on the front panel or in the menu system. To address this, the design team added a simple yet eye-catching animation that points the user to the Enter button. The Enter button is a general-purpose front panel control that can be linked to many types of programmable keys for quick adjustment of their values. Existing users will find the Enter button familiar. For new users, this quick, simple, and animated indicator will help them get started using the instrument immediately. Taking advantage of the new color scheme, the Enter button icon has also been colored, making it much easier to select the linked programmable key at a glance—a small improvement that will be appreciated by both new and experienced users.
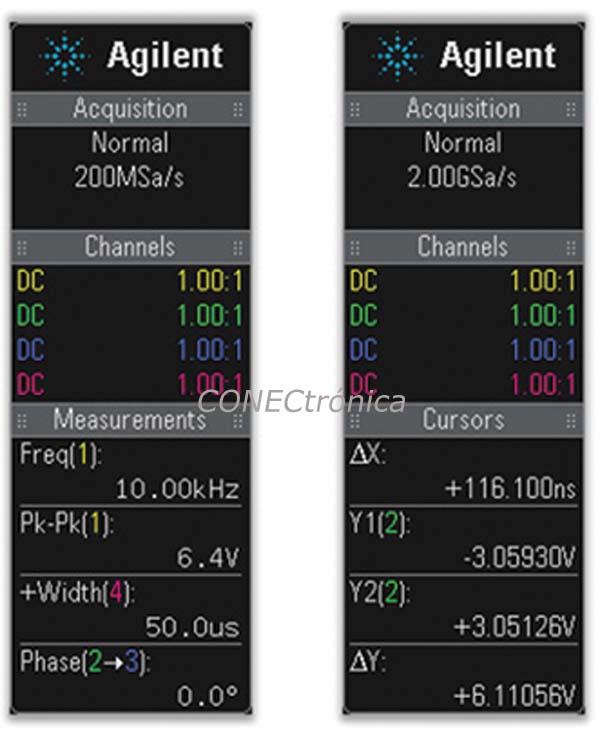
The new sidebar provides useful information without cluttering the waveform area.
The sidebar is a new GUI area located to the right of the waveforms, displaying information that is convenient to have visible at all times, regardless of the open menu. The sidebar now contains elements such as acquisition settings, channel adjustments, measurement readings, and cursor values. Adding this type of information to the sidebar helps to declutter certain menus and, more importantly, removes many of these elements from the waveform area, resulting in a simpler, cleaner design and greater ease of use.
Powerful, time-saving features:
The hardware-based waveform search function allows users to search for events such as edges, pulses, and pulse amplitude variations. This is useful for examining long data logs in seconds, instead of spending days searching for the exact right part of the waveform. The ability to copy search criteria to the trigger allows for quick triggering of any event of interest encountered during the search.
The reference memory function allows users to save, recall, display, manipulate, and measure waveform data as if it were on a live channel. Up to two reference waveforms can be stored in the oscilloscope's non-volatile memory locations. Compare these reference waveforms with live waveforms and perform post-analysis and measurements on the stored data. You can also store waveforms on a removable USB memory device and retrieve them later from the oscilloscope's reference waveform memory if needed for further analysis.
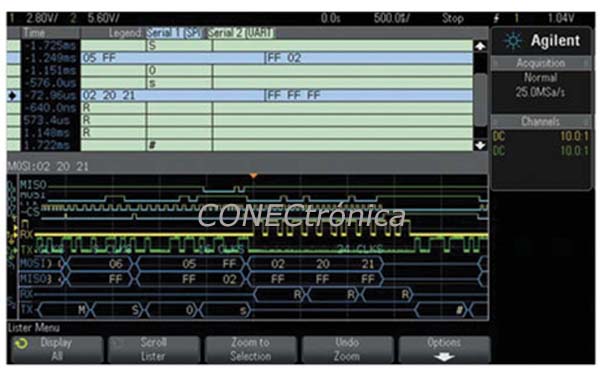
Displaying Multiple Buses in List Format
Many modern designs include multiple serial buses. Sometimes it may be necessary to correlate data from one serial bus to another. In this case, it is very useful to be able to display two buses simultaneously. In the example in Figure 3, the oscilloscope has decoded a 4-wire SPI bus in HEX format, in addition to transmitting and receiving RS232/UART signals in an ASCII-decoded format and displaying the data in an on-screen list.
A good oscilloscope is an ideal combination of hardware and software innovation in a compact, well-designed, and affordable package. Creating such an instrument requires innovation and creative design from experienced engineers. Agilent's design engineers have risen to the challenge and hope industry professionals will enjoy using it as much as they enjoyed creating it.
The author , Mischa Fender, is an R&D Software Engineer – High Volume Oscilloscopes, Digital Test Division, Electronic Measurement Group, Agilent Technologies.
In 1998, Mischa Fender joined Agilent Technologies (Hewlett Packard) in Colorado Springs, Colorado, as an R&D engineer working on the 546xx generation of digital oscilloscopes. Since then, he has worked extensively on the Infiniium (HPS) and InfiniiVision (HVS) oscilloscope lines.
He is currently the R&D Software Team Leader and the High Volume Oscilloscope Team Architect at Agilent in Colorado Springs.
Mischa Fender holds a degree in electrical engineering from the University of Wisconsin–Madison. When not writing oscilloscope code, he enjoys hiking, movies, hockey (as a spectator only), and video games with his family and friends.
Author: Mischa Fender, R&D SW Engineer – High Volume Oscilloscopes. Digital Testing Division.
Electronic Measurement Group. Agilent Technologies.